Remote Desktop
If you can read this, your browser is unable to properly import or use
Cascading Style Sheets (CSS). Please upgrade to a more modern browser.
A tutorial on the use of Microsoft Windows Remote Desktop
for remote access to the KSU Physics Department computers.
Introduction
With the introduction of the firewall to our computing network, we have seriously limited remote access to the Physics computing systems. General-purpose remote access now requires using either Secure Shell (ssh) or Windows Terminal Services (known as Remote Desktop in Windows XP).
Terminal Services is a particularly useful remote access tool that gives you a complete Windows desktop with access to the department's network and the applications that you need to get work done. Sitting at a remote Terminal Services desktop can be virtually indistinguishable from sitting at a normal, local PC here in Cardwell Hall.
There are several different versions of the Terminal Services software. This tutorial will describe the use of a particular version available from the Physics Computing Support Center (PCSC) that provides the best service, along with the default version shipped on Windows XP computers.
Before you do anything though, you need to contact the PCSC to have your remote access privileges enabled.
(If you are using the Windows XP Remote Desktop client, you may skip the next section.)
PCSC Terminal Services
This version of the software is available at the PCSC of can be downloaded here. This version is intended to be installed using a pair of floppy disks. If you downloaded the files rather than getting the disks from us, unzip the download and read the "ReadMe" file for instructions.
Once installed, you should have a Start Menu folder named "Terminal Services Client". In that folder, click on "Client Connection Manager". One-time use of this application will let you create an icon representing a connection to our Terminal Server.
From the "Client Connection Manager" File menu, select "New Connection" to launch the manager's wizard. Click "next" on the splash screen to actually start the process. Enter a name for your new connection; "Physics Terminal Server" for example. Then enter the address of our server "pike.phys.ksu.edu". Click "next" the proceed.
The next window offers you the option of saving your username and password so that you can automatically log on. If you're certain that no one else will be able to abuse your account, you can use this. On an otherwise unprotected laptop that might get stolen, or if your spouse or kids might be playing with your computer, don't do it. It only takes a moment to log on manually, and strong, uncompromised passwords are our best defense against hacking. Click "next" again when you're done here.
You can now choose whether to run your Terminal Service sessions in a window or on the full screen. We recommend a full-screen session as the easiest to use. To get a full-screen session, select the highest resolution from the options presented at the top of this window, and then check "Full Screen" in the lower half. If you prefer a windowed session, check the window size that you would like (bigger is better) and leave the "Full Screen" option unchecked. Hit "next" again to continue.
Always check both the "Enable Compression" and "Cache Bitmaps" options on this page. These options allow the fastest performance; I can't imagine why anyone wouldn't use these features. Click "next" yet again.
You have the option of specifying a program that you would like to run every time that you log on to this connection. This essentially replicates having that program in your "Startup" Start Menu folder. Use it or skip it as you like, then click "next".
Finally, you can choose an icon for your connection and a Start Menu folder to place it in (in practice, you are usually only allowed to select the "Terminal Services Client" folder). To accept the recommended defaults, just hit "next".
The process is now complete. Click "Finish" to exit the wizard, and you should see an icon with your connection name in the "Connection Manager". You can close the "Connection Manager" and go look in the "Terminal Services Client" Start Menu folder to find the same icon. Click on it to launch your connection.
(You may skip the next section and go directly to Using Terminal Services)
WinXP Remote Desktop
Windows XP comes with its own version of Terminal Services called the
Remote Desktop Connection. It can be found in the Start menu under "Accessories
| Communication". With our current server, Remote Desktop cannot
provide the cut-and-paste functionality that the PCSC Terminal Services
package does, but when we eventually upgrade our server to Windows 2003,
Remote Desktop will offer much greater flexibility.
The basic functionality of Remote Desktop is the same as the older client,
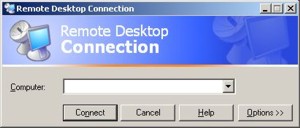
but the user interface is subtly different. When you launch the application,
you will be presented with a small logon window. Click the "Options"
button to reveal the full window.
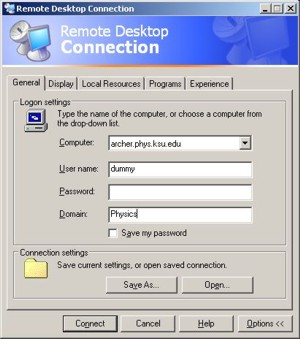 Under the "General" tab, you can enter the server name,
"pike.phys.ksu.edu".
Also enter your username, password (optionally) and the domain name "Physics".
On the "Display" tab, select a window size for the remote desktop display, or move the slider all the way to the right to select a full-screen display (as we recommend). You can also select a color level (use the highest possible). If you choose to use a full-screen display, you may also wish to click on "Display the connection bar..."; this will add an unobtrusive toolbar to the top of your full-screen display that identifies the remote session and makes transitioning from the remote to the local desktop more convenient.
You can safely ignore the "Local Resources" and "Programs" tabs. On the "Experience" tab you should select the sort of network connection you are using. If you select "Modem", a minimum of graphical elements will be downloaded to your local desktop, improving the program speed. If you have a cable modem or DSL connection, feel free to choose the "LAN" setting and get the fullest graphical experience.
Finally, go back to the "General" tab and save this configuration. Use the default filename of "default.rdp" for convenience.
Now click on the "Connect" button to begin your Remote Desktop session.
Using Terminal Services
A desktop will appear and challenge you to logon. Do so, and you should then be presented with a standard Windows desktop with a number of application icons (Hint - change the color of your remote desktop to something different than your regular local desktop. You can get confused about which computer is which if you hop back-and-forth between them much; the color cue helps you avoid that.).
Note that this desktop is not the same as your regular Physics account gives you. The Terminal Server is logically separated from the regular Physics domain because it is exposed to the outside world, and so it keeps its own set of user profiles and applications. You will need to customize your remote desktop separately.
The suite of applications available remotely is similarly limited. There are many networking applications available, such as Internet Explorer, the eXceed X server, a SSH and SCP client, an FTP client and even the Terminal Services Client. Productivity applications include the Microsoft Office suite and Origin. A variety of utilities are also provided.
Using Terminal Services in combination with the other networking applications can be quite powerful. For example, if you're traveling and need a file from your Windows account, you can log on to Pike and and use either FTP or SCP to transfer the file to your local machine. You could do the opposite as well; use SCP to move a remote file to our unix system, and then simply copy that file from your unix "P:" drive to your Windows "O:" drive with Windows Explorer.
There is a limited ability to cut-and-paste both data and files between local and remote machines within Terminal Services itself (this is why we have a special version of the software; there are many conditions that must be met to make this work). If you select a file, right-click on it and pick "Copy" and then move to the other desktop and right-click, you will see a small window pop up telling you that a file transfer is happening. This little window will then disappear and you can right-click again, select "Paste" and your file will appear where you put it.
(If you're in full-screen mode, the easiest way to switch between the local and remote desktops is to use the "Alt-Tab" key combination. This lets you toggle between running applications.)
For reasons that we do not yet understand, this file transfer is limited to a rate of 512 kbps no matter how fast your network connection may be. This cut-and-paste trick is fine for moving a few small files, but it your files are many and/or large, consider using SCP (or FTP from inside the firewall out).
Finally, when your Terminal Services session is complete, please "Log Off" rather than "Disconnect" or "Shutdown". Any choice other than "Log Off" will leave your session active, and any running programs will continue to run. If you logon again, you will rejoin this same session, but we have found that some services do not behave well on the second connection. If you forget to choose "Log Off" or are disconnected by accident, your session will automatically terminate after one hour of inactivity.
More Information
Please see Microsoft's Working Remotely with Windows XP for more details on XP mobility features.
Last updated on Friday, 27-Apr-2012
